4. Menus
The following sections summarise the menu functionality and provide some guidelines for their use. Where menu functions are also available on one of the toolbars the relevant icon is shown next to each heading.

Main Window - Toolbars
4.1. File Menu

Main Window - File Menu
The File menu contains the following functions:
4.1.1. Export…
Allows users to export data from the HLU database to a GIS layer using a pre-defined export format.
See also
See Export Window and Exports for more information.
4.1.2.  Exit
Exit
Exits the HLU Tool and prompts users to choose whether or not to close the associated GIS window.
4.2. Edit Menu
Main Window - Edit Menu
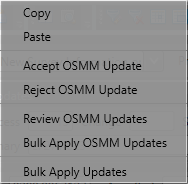
The Edit menu contains the following functions:
Note
When the tool is launched, the database tool is read-only by default as indicated. To enable edit mode, the user details must be configured in the database (see ‘Lookup Tables’ in the HLU Tool Technical Guide at readthedocs.org/projects/hlutool-technicalguide for details) and the spatial data must be editable in the GIS application.
4.2.1.  Copy
Copy
Copies selected attributes so they can be applied to these fields in another record.
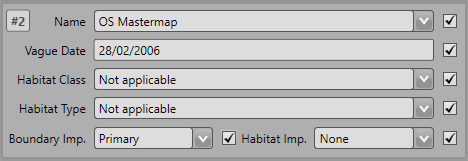
Main Window - Copy Checkboxes
Tick the checkboxes next to the fields to be copied, as shown in the figure Main Window - Copy Checkboxes, then click Copy.
4.2.2.  Paste
Pastes the data copied by the ‘Copy’ function into the same fields in another record. For example, the fields copied in the figure above would be pasted into ‘Source 2’ on the new record.
Note
It is not possible to copy data from one field and paste it into a different field.
4.2.3. Accept OSMM Update
Accept the proposed update for the current INCID. Once accepted, the update will be ‘Pending’ and must then be applied using the Bulk Apply OSMM Updates function.
See also
See Review OSMM Updates Window for more information.
4.2.4. Reject OSMM Update
Reject the proposed update for the current INCID.
See also
See Review OSMM Updates Window for more information.
4.2.5. Review OSMM Updates
Allows users to review any outstanding Ordnance Survey MasterMap (OSMM) updates and choose to accept or reject each update. Once accepted, the updates will be ‘Pending’ and must then be applied using the Bulk Apply OSMM Updates function.
See also
See Review OSMM Updates Window for more information.
4.2.6. Bulk Apply OSMM Updates
Enables users to apply pending OSMM updates for multiple selected features and database records (INCIDs) simultaneously.
See also
See Bulk OSMM Update Window for more information.
4.2.7. Bulk Apply Updates
Enables users to update the attributes for multiple selected features and database records (INCIDs) simultaneously.
See also
See Bulk Update Window for more information.
4.3. View Menu
Main Window - View Menu
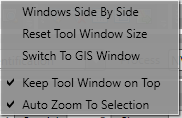
The View menu contains the following functions:
4.3.1.  Windows Side By Side
Aligns the HLU window to the top left of the screen and expands the GIS window to fill the remaining area as shown in the figure Main Window - Side by Side.

Main Window - Side by Side
4.3.2.  Zoom to Selection
Zooms to the currently selected features in the active GIS layer.
4.3.3. Reset Tool window Size
Returns the window height and width to their default size.
4.3.4. Switch to GIS window
Sets the connected ArcGIS or MapInfo session as the active window but does not alter its size.
4.3.5. Keep Tool window on top
An option to keep the HLU Tool window floating on top of any other application windows so that it is always visible. Enabling this option will ensure that the window will not disappear behind the GIS window when the GIS window is active.
4.3.6. Auto Zoom to selection
An option to automatically zoom to the GIS features associated with an INCID in the active GIS layer whenever the INCID selection is changed using the HLU Tool.
4.4. Select Menu
Main Window - Select Menu
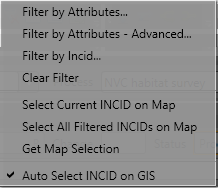
The Select menu contains the following functions:
4.4.1.  Filter by Attributes…
Allows users to filter the INCID records based upon non-spatial or complex criteria using the query builder or advanced query builder. Only INCID records matching the filter criteria will be available for viewing using the record selectors.
See also
See Query Builder Window and Advanced Query Builder Window for more information.
4.4.2. Filter by Attributes - Advanced…
When reviewing OSMM updates, allows users to filter the INCID records based upon non-spatial or complex criteria using the advanced query builder. Only INCID records matching the filter criteria, and where the OSMM update status is not ‘Pending’ or ‘Applied’, will be available for reviewing.
See also
See Advanced Query Builder Window for more information.
4.4.3. Filter by Incid…
Allows users to filter the INCID records for a specific INCID.
See also
See Filter by Incid Window for more information.
Allows users to filter the INCID records based upon non-spatial or complex criteria using the Filter by Incid window. Only INCID records matching the filter criteria will be available for viewing using the record selectors.
4.4.4.  Clear Filter
Clears the current INCID filter so that all records are available for viewing using the record selectors.
4.4.5.  Select Current INCID on Map
Selects all of the GIS features associated with only the current INCID record in the GIS layer.
4.4.6.  Select All Filtered INCIDs on Map
Selects all of the GIS features associated with all of the currently filtered INCID records in the active GIS layer.
Caution
This process may take a long time depending upon the number of currently filtered INCID records, the GIS layer size and their geographical distribution.
4.4.7.  Get Map Selection
Filters the database records to retrieve the attributes associated with the selected features in the active GIS layer.
Tip
Selecting one or more features on the map and clicking Get Map Selection will select only the database records associated with the selected features. The INCID records can then be viewed using the record selectors and the number of selected features associated with the current INCID record will be displayed in the INCID status area to the right (together with the total number of features associated with the current INCID). Clicking Select Current INCID on Map allows users to expand the map selection to include all features belonging to the current INCID.
4.4.8. Auto Select INCID on GIS
An option to automatically select the GIS features associated with the current INCID record in the active GIS layer.
4.5. Split/Merge Menu
Main Window - Split/Merge Menu
Note
All options in this menu are disabled until the database records have been filtered and a process and reason has been selected from the ‘Process’ and ‘Reason’ drop-down lists in the INCID section on the main window. For details on the INCID section see INCID Section.
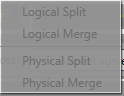
The Split/Merge menu contains the following functions:
4.5.1.  Logical Split
Splits features from the same current INCID into a new INCID. Logical splits are used to isolate one or more features from one INCID into a new INCID so that they can be updated independently.
See also
See Logical Split for more information on this action.
4.5.2.  Logical Merge
Combines two or more features selected in GIS into the INCID of one of the selected features (which must be selected from the list of INCIDs displayed during the logical merge process).
See also
See Logical Merge for more information on this action.
4.5.3.  Physical Split
Sub-divides a single feature, that has already been split in the GIS layer, into one or more new TOID fragments in the database by assigning new TOID fragment identifiers. The fragments can then be assigned different attributes (once they have been logically split from one another).
See also
See Physical Split for more information on this action.
4.5.4.  Physical Merge
Combines two or more fragments of a single TOID, that are also associated with the same INCID, into a new single merged feature in the GIS layer and assigns them to the same TOID fragment identifier.
See also
See Physical Merge for more information on this action.
4.6. Tools Menu
Main Window - Tools Menu
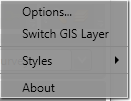
The Tools menu contains the following functions:
4.6.1.  Options…
Allows users to alter many aspects of the HLU Tool configuration specific to their own requirements.
See also
See Options Window for more information.
4.6.2.  Switch GIS Layer
Allows users to switch between valid HLU layers in the GIS application.
See also
See Switch GIS Layer Window for more information.
4.6.3. Styles
Allows the user to select one of the following styles for all HLU Tool interfaces and windows:
Original
Light Grey
Dark Grey
Shiny Blue
4.6.4. About
Displays the following information about the HLU Tool:
Current application and database versions
Current database connection details
Current user id and name
Copyright statements
Links to the on-line User and Technical Guides